🧰 Hardware
Diese Seite erklärt den Hardware-Aufbau einer AllSky-Kamera => erst die Grundkonfiguration (damit die Kamera zuverlässig läuft), danach optionale Sensorik zur Erweiterung.
Preise sind Richtwerte. Manche Komponenten gibt es in mehreren Varianten – im Zweifel lieber in der Community nachfragen.
Kurzüberblick
- Grundkonfiguration => Damit die Kamera stabil Bilder erzeugt.
- Erweiterte Konfiguration => Sensoren für Daten, Monitoring & Qualität.
- Am Ende => komplette Teileliste mit Preisen und Suche.
💡
Hinweis: Diese Seite enthält Affiliate-Links. Wenn du über diese Links einkaufst, erhalten wir gegebenenfalls eine kleine Provision. Für dich bleibt der Preis unverändert.
🧭 Wichtige Entscheidungen vor dem Kauf
Bevor du Teile bestellst, solltest du die wichtigsten Bauentscheidungen festlegen.
Jede Karte führt dich zum passenden Abschnitt.
🧱 Empfohlene Build-Profile
Nicht jede Kamera muss gleich aufgebaut sein. Diese Profile helfen beim Einstieg.
Die Profile sind als Orientierung gedacht.
💶 Budget & Optionen
Stand: 25.06.2026 • Preise teils abhängig vom Anbieter
Optionaler Sensorik-Anteil: 29,70 €
•
Gesamt ohne Sensorik: 379,50 €
Gesamtsumme
409,20 €
Tipp => Starte klein – Sensorik kannst du später nachrüsten.
⚙️ Grundkonfiguration
Alles, was du brauchst, damit die Kamera zuverlässig läuft und die typischen AllSky-Ausgaben erzeugt.
Ziel => Kamera läuft 24/7 und liefert Bilder & Ausgaben.
Raspberry Pi 4+ (4 GB RAM) o. Raspberry Pi 5 (~70€)
Empfohlen
65,00 €
Du kannst einen Raspberry Pi 4 oder 5 verwenden. Empfohlen sind mindestens 4GB RAM (mehr ist besser), weil Bildverarbeitung, Timelapse/Keogramm/Startrails und Upload parallel laufen.
MicroSD-Karte 64–128 GB
Must-have
10,00 €
Als Systemspeicher verwende ich eine SD-Karte. Minimum 64GB – besser 128GB, damit Logs, Updates und Pufferdateien langfristig stabil bleiben.
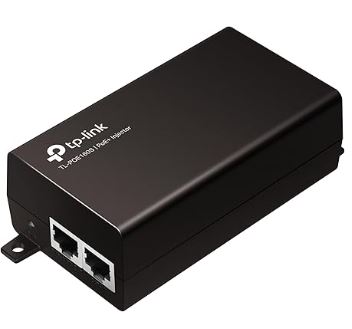
PoE HAT (ACHTUNG => für Raspi 5 ein anderen PoE-HAT wählen!)
Empfohlen
25,00 €
Für den Außenbetrieb empfehle ich PoE => Du brauchst einen PoE-Switch oder PoE-Injektor/Netzteil mit mindestens 30W. Der PoE-HAT muss zur jeweiligen Raspberry-Pi-Version passen.
PoE Injector 30W (Netzteil, indoor)
Optional
25,00 €
Anforderung PoE-HAT => IEEE 802.3af/at PoE Standard, 5V USB-A und 12V Header Ausgänge.
Litze max. 0,25 mm² (schwarz & rot)
Notwendig
8,00 €
Leitungen für Strom- und Sensorverkabelung.
Netzwerkstecker wasserdicht
Empfohlen
10,00 €
Wettergeschützte Netzwerkverbindung.
Weiter geht’s
Wenn die Grundhardware steht, folgt als nächster Schritt das Gehäuse (Wetterfestigkeit, Dome, Heizung, Belüftung).
📷 Kamera, Optik & Außenhaut
Hier legst du fest, wie die Kamera nach außen schaut und mechanisch eingebettet wird.
Bildqualität beginnt bei Kamera und Optik.
Raspberry Pi HQ Kamera (M12 oder C-Mount) (ACHTUNG => Flachbandkabel bei RPi4 und RPi5 sind unterschiedlich!)
Must-have
60,00 €
Als Kamera geht die Raspberry Pi HQ-Kamera (klassisch) – alternativ funktionieren auch ZWO ASI Kameras. Beim Objektiv setze ich auf ein Fisheye, damit möglichst viel Himmel ins Bild passt.
Objektiv 185° F1.85 – F2.7
Must-have
20,00 €
Tipp => Ein gutes Fisheye-Objektiv ist der wichtigste Hebel für Bildqualität und Blickwinkel.
Acryl-Dome 100 mm
Notwendig
16,00 €
Der Acryl-Dome schützt Kamera und Optik. Ein passender Dichtring (O-Ring) sorgt dafür, dass der Abschluss am Gehäuse sauber und wetterfest ist.
Dichtringe Ø120 / 2,4 mm
Notwendig
5,00 €
Tipp => Dome regelmäßig reinigen – Schmutz und Mikrokratzer wirken direkt auf die Bildqualität.
M3-Schraubenset Zylinderkopf
Notwendig
6,00 €
Montagematerial für Gehäuse und Einbauten.
M3-Schraubenset Linsenkopf
Notwendig
6,00 €
Schrauben für die Gehäusemontage.
Raspberry Pi HEX-Schraubenset
Empfohlen
10,00 €
Abstandshalter und Montageset für Raspberry Pi.
Weiter geht’s
Wenn die Grundhardware steht, folgt als nächster Schritt das Gehäuse (Wetterfestigkeit, Dome, Heizung, Belüftung).
🛠️ Betrieb, Schutz & Steuerung
Für den Außeneinsatz spielen Heizung, Lüfter und Schaltlogik eine wichtige Rolle.
Langzeitstabilität früh einplanen.
1-Kanal 5V Relais für Heizung
Empfohlen
3,00 €
Damit steuerst du 12V-Heizung und/oder zusätzliche Lüfter automatisch. Das macht das System robuster bei wechselnden Bedingungen.
Heizring 2,8 W (dewcontrol.com) oder 3 Zementwiderstand 5 W 15Ohm (günstiger)
Empfohlen
25,00 €
Hilft gegen Beschlag und Probleme bei Kälte oder hoher Feuchte.
Noctua Lüfter 5V
Optional
16,00 €
Verbessert Temperaturmanagement und kann Feuchteprobleme reduzieren.
GPIO-HAT
Optional
15,00 €
Hilft bei sauberer Erweiterung der GPIO-Nutzung.
Klebstoff „Kraftprotz“ (flüssig & gel)
Optional
13,00 €
Je nach Aufbau als Zusatz sinnvoll.
Weiter geht’s
Wenn die Grundhardware steht, folgt als nächster Schritt das Gehäuse (Wetterfestigkeit, Dome, Heizung, Belüftung).
🧪 Erweiterungen => Sensorik & Extras
Mit Sensoren kannst du die Kamera „wissenschaftlicher“ machen => Wetterdaten, Himmelshelligkeit und Wolkenindizien werden mit den Bildern verknüpft und zentral gespeichert.
Alles optional – du kannst später jederzeit nachrüsten.
BME280 Temp/Hum/Press
Empfohlen
5,00 €
Misst Temperatur, Luftdruck und (je nach Modul) Luftfeuchtigkeit. Hilft bei Diagnose und erklärt Bild-/Tau-Effekte durch Wetter.
DS18B20 Temp
Optional
3,00 €
Ein einfacher, robuster Temperaturfühler (z. B. für Gehäuse-Innenraum oder Dome-Nähe). Praktisch für Debugging und Regelung.
4,7 kΩ Widerstände
Optional
0,10 €
Widerstand für Sensorschaltungen.
TSL2591 Lichtsensor
Empfohlen
5,00 €
Erfasst die Helligkeit des Himmels (Lichtverschmutzung, Mond, Wolken). Ideal, um Nächte zu vergleichen und Grenzwerte fürs Processing zu setzen.
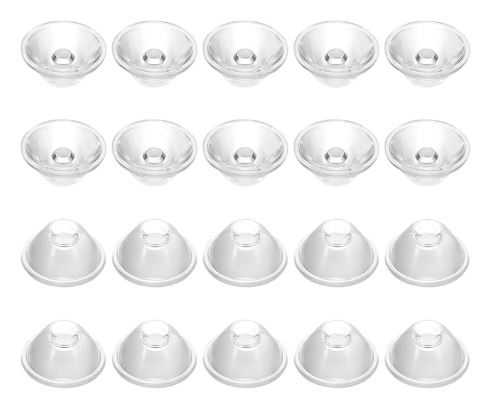
Sammellinse 20°
Optional
0,10 €
Optionales Zubehör für TSL2591-Aufbau.
MLX90614 IR Temperaturfühler
Optional
16,50 €
Misst IR-Temperaturen (Himmel vs. Umgebung). Daraus lassen sich Wolken- und Klarheitsindikatoren ableiten.
Wofür lohnt sich Sensorik besonders?
Wenn du Vergleichbarkeit willst => gleiche Kamera, aber unterschiedliche Standorte/Nächte. Sensorwerte helfen, Bildqualität, Wolken und Himmelshelligkeit objektiver einzuordnen.
📦 Teile-Explorer
Unten findest du die komplette Teileliste als Nachschlagewerk. Suche filtert über alle Kategorien; Sensorik kannst du per Schalter ein-/ausblenden.
Grundkonfiguration
4 Teile
Zwischensumme:
155,00 €
Grundausstattung
| Teil | Rolle | Profile | Preis |
|---|---|---|---|
|
Raspberry Pi 4+ (4 GB RAM) o. Raspberry Pi 5 (~70€)
|
Empfohlen | Starter Build • Standard Build | 65,00 € |
|
MicroSD-Karte 64–128 GB
|
Must-have | Starter Build • Standard Build | 10,00 € |
|
Raspberry Pi HQ Kamera (M12 oder C-Mount) (ACHTUNG => Flachbandkabel bei RPi4 und RPi5 sind unterschiedlich!)
|
Must-have | Starter Build • Standard Build • Sensor Build • Advanced Build | 60,00 € |
|
Objektiv 185° F1.85 – F2.7
|
Must-have | Starter Build • Standard Build • Sensor Build • Advanced Build | 20,00 € |
Sensorkonfiguration
6 Teile
Zwischensumme:
29,70 €
Sensoren & Zusätzliches (optional)
| Teil | Rolle | Profile | Preis |
|---|---|---|---|
|
BME280 Temp/Hum/Press
|
Empfohlen | Sensor Build • Advanced Build | 5,00 € |
|
DS18B20 Temp
|
Optional | Sensor Build • Advanced Build | 3,00 € |
|
4,7 kΩ Widerstände
|
Optional | Sensor Build • Advanced Build | 0,10 € |
|
TSL2591 Lichtsensor
|
Empfohlen | Sensor Build • Advanced Build | 5,00 € |
|
Sammellinse 20°
|
Optional | Sensor Build | 0,10 € |
|
MLX90614 IR Temperaturfühler
|
Optional | Sensor Build • Advanced Build | 16,50 € |
Kabel & Elektrik
10 Teile
Zwischensumme:
93,50 €
Grundausstattung
| Teil | Rolle | Profile | Preis |
|---|---|---|---|
|
PoE HAT (ACHTUNG => für Raspi 5 ein anderen PoE-HAT wählen!)
|
Empfohlen | Standard Build • Advanced Build | 25,00 € |
|
PoE Injector 30W (Netzteil, indoor)
|
Optional | Standard Build • Advanced Build | 25,00 € |
|
1-Kanal 5V Relais für Heizung
|
Empfohlen | Sensor Build • Advanced Build | 3,00 € |
Kabel & Elektrik
| Teil | Rolle | Profile | Preis |
|---|---|---|---|
|
Dupont-Kabel (Jumper-Kabel) Set
|
Notwendig | Sensor Build • Advanced Build | 7,00 € |
|
Litze max. 0,25 mm² (schwarz & rot)
|
Notwendig | Starter Build • Standard Build • Sensor Build • Advanced Build | 8,00 € |
|
Kabel-Klemmen 2 Stück
|
Optional | Advanced Build | 0,50 € |
|
Netzwerkkabel lang (Injector ↔ Kamera)
|
Notwendig | Standard Build • Advanced Build | — |
|
Netzwerkkabel lang (Dose ↔ Injector)
|
Notwendig | Standard Build • Advanced Build | — |
|
Netzwerkstecker wasserdicht
|
Empfohlen | Standard Build • Advanced Build | 10,00 € |
|
GPIO-HAT
|
Optional | Sensor Build • Advanced Build | 15,00 € |
Montage & Zubehör
10 Teile
Zwischensumme:
131,00 €
Grundausstattung
| Teil | Rolle | Profile | Preis |
|---|---|---|---|
|
Noctua Lüfter 5V
|
Optional | Advanced Build | 16,00 € |
|
Acryl-Dome 100 mm
|
Notwendig | Starter Build • Standard Build • Sensor Build • Advanced Build | 16,00 € |
|
Dichtringe Ø120 / 2,4 mm
|
Notwendig | Starter Build • Standard Build • Sensor Build • Advanced Build | 5,00 € |
|
Heizring 2,8 W (dewcontrol.com) oder 3 Zementwiderstand 5 W 15Ohm (günstiger)
|
Empfohlen | Standard Build • Advanced Build | 25,00 € |
3D-Druck (Filament)
| Teil | Rolle | Profile | Preis |
|---|---|---|---|
|
ASA weiß 1 kg Rolle
|
Empfohlen | Standard Build • Advanced Build | 17,00 € |
|
ASA schwarz 1 kg Rolle
|
Empfohlen | Starter Build • Standard Build • Advanced Build | 17,00 € |
Montage & Zubehör
| Teil | Rolle | Profile | Preis |
|---|---|---|---|
|
M3-Schraubenset Zylinderkopf
|
Notwendig | Starter Build • Standard Build • Sensor Build • Advanced Build | 6,00 € |
|
M3-Schraubenset Linsenkopf
|
Notwendig | Starter Build • Standard Build • Sensor Build • Advanced Build | 6,00 € |
|
Klebstoff „Kraftprotz“ (flüssig & gel)
|
Optional | Standard Build • Advanced Build | 13,00 € |
|
Raspberry Pi HEX-Schraubenset
|
Empfohlen | Starter Build • Standard Build • Sensor Build • Advanced Build | 10,00 € |
🧪
Empfehlung => Erst als Prototyp testen
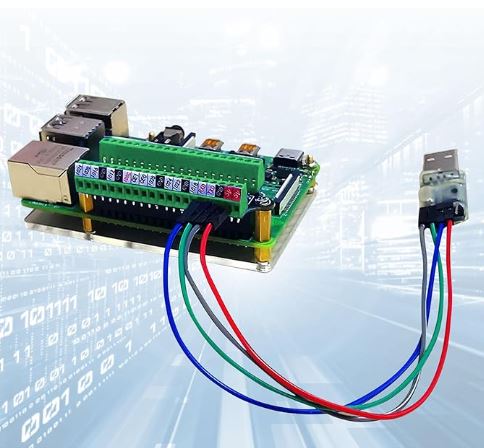
Bevor du alles ins Gehäuse einbaust, lohnt sich ein Prototyp-Aufbau ohne Case. So kannst du Komponenten prüfen, Verkabelung planen und spätere Umbauten vermeiden.
Warum zuerst ohne Case?
- Sensoren, Kamera und Raspberry Pi lassen sich in Ruhe testen.
- Du siehst früh, ob Stromversorgung/PoE stabil läuft und nichts überhitzt.
- Die spätere Kabelführung im Gehäuse wird viel klarer.
So gehst du vor
- Baue die Grundkonfiguration auf einer offenen Unterlage (z. B. Tisch/Platte) auf.
- Teste Kamera-Output und (optional) Sensorwerte, bevor du montierst.
- Erst wenn alles stabil läuft, kommt der Einbau ins Gehäuse (mit finaler Verkabelung).
Schaltplan & Verkabelung
Der Schaltplan zeigt den grundlegenden Aufbau für Prototyping, Heizung, Lüfter und Sensoren. Mit diesem Aufbau kannst du die komplette Hardware testen, bevor sie ins Gehäuse eingebaut wird.

Klicken zum Vergrößern
Tipp => Mach Fotos vom Prototypen und notiere dir Kabellängen/Stecker — das spart beim finalen Einbau richtig Zeit.
❓ Häufige Fragen
Kurze Antworten aus der Praxis – mit Bildern und Links.
Noch Fragen? Frag in der Discord-Community
Viele Fragen rund um Hardware, Aufbau, Sensoren und Fehlerbehebung werden dort gemeinsam beantwortet – von Kamera-Besitzern und Interessierten aus dem Netzwerk.