External Sensor API
Send weather and environmental data from your own sensor station directly into the AllskyKamera network.
https://allskykamera.space/api/v1/weather.phpX-API-KeyQuick overview
The External Sensor API stores weather and environmental measurements for cameras in the AllSkyKamera network. It is intended for technical users who want to connect their own weather station, SQM meter or small sensor node to their camera page.
Typical sources are weather stations, SQM devices, BME280, DS18B20, TSL2591 and custom environmental measurements. Values are stored first and can then be configured for display in the user area.
Basics
| Base URL | https://allskykamera.space/api/v1/weather.php |
|---|---|
| Version | v1 |
| Format | application/json |
| Transport | HTTPS only |
| Allowed methods | POST for writes, GET for reads |
| Authentication | X-API-Key header |
Authentication
Every request must include the camera secret key in the X-API-Key header. The key maps the request to the correct camera ID internally; GET queries are automatically filtered to that camera via the Influx tag kamera.
X-API-Key: DEIN_GEHEIMER_KAMERA_KEYNever put this key into public websites, GitHub repositories or client-side JavaScript.
POST: write sensor data
POST writes external sensor data into the shared InfluxDB. All uploaded values are stored in ext_sensors and tagged with your camera ID as kamera. If supplied, ext_sensor is added as an additional tag.
Endpoint
POST https://allskykamera.space/api/v1/weather.phpHeader
X-API-Key: DEIN_GEHEIMER_KAMERA_KEYContent-Type: application/jsonJSON structure
{
  "timestamp": "2026-05-20T21:15:00Z",
  "ext_sensor": "Dachstation",
  "fields": {
    "BME280_temp_c": 22.9,
    "BME280_hum_pct": 48.5,
    "DS18B20_temp_c": 21.3
  }
}| Field | Required | Format | Description |
|---|---|---|---|
timestamp | yes | ISO8601, UTC | Required by the current code. Parsed with strtotime; invalid values return 400. |
ext_sensor | no | string | Optional sensor or station name. Empty values are not written as tag. |
fields | yes | object with numeric values | Only numeric values are written. Non-numeric entries are ignored; if none remain, the API returns 400 No numeric fields. |
Field names are sanitized before writing: characters outside A-Z, a-z, 0-9 and underscore become underscores. Use clear units in the field name, for example temp_c, hum_pct, pressure_hpa or sky_brightness.
Successful response
{
  "status": "ok"
}
GET: read sensor data
GET reads measurements from InfluxDB. The API key determines your camera, and the query always includes r["kamera"] == "ASKxxx". You cannot query another camera by passing a camera parameter.
Endpoint
GET https://allskykamera.space/api/v1/weather.phpHeader
X-API-Key: DEIN_GEHEIMER_KAMERA_KEYPossible values for measurement and fields can be discovered with mode=metadata.
Query parameters
| Name | Type | Default | Example | Description |
|---|---|---|---|---|
measurement | string | ext_sensors | raspistatus | Influx measurement to query. Sanitized to letters, digits and underscores. The current code does not enforce a fixed allow-list. |
fields | string | empty | temp_c,hum_pct | Comma-separated field list. Each field is sanitized to letters, digits and underscores; at most 20 unique fields are used. |
hours | integer | 24 | 6 | Fallback time range in hours when start is not set. Values smaller than 1 become 1. |
start | duration | empty | -6h, -7d | Alternative range start. Supported values are negative durations with s, m, h, d or w. Invalid values fall back to hours. |
limit | integer | 500 | 1000 | Maximum number of returned rows after sorting newest first. Values smaller than 1 become 1. |
pivot | 0|1 | 0 | 1 | 0 returns long format. 1 pivots fields into columns and returns wide format. |
aggregate | none|mean|last|min|max | none | mean | Only none, mean, last, min and max are accepted; other values silently become none. |
every | duration | 0 | 5m | Aggregation interval. The code accepts 0, seconds, minutes and hours such as 30s, 5m or 1h. Invalid values become 0. |
ext_sensor | string | empty | Dachstation | Optional filter for the ext_sensor tag. Sanitized to letters, digits and underscores. |
Long format
Long format is the default. Every row contains one field value.
[
  {
    "time": "2026-05-20T21:15:00Z",
    "value": 18.42,
    "field": "raspiDiskFree",
    "measurement": "raspistatus",
    "ext_sensor": null,
    "kamera": "ASK999"
  }
]
Pivot / wide format
pivot=1 returns one row per timestamp with fields as columns. Numeric strings are cast to numbers; empty values become null.
[
  {
    "time": "2026-05-20T21:15:00Z",
    "_measurement": "ext_sensors",
    "kamera": "ASK999",
    "ext_sensor": "Dachstation",
    "temp_c": 22.9,
    "hum_pct": 48.5
  }
]
GET: metadata
With mode=metadata, users can discover which measurements and fields are available for their own API key. The response is automatically restricted to the camera assigned to the key via the Influx tag kamera.
mode=metadatameasurement / fieldsGET with selected parametersEndpoint
GET https://allskykamera.space/api/v1/weather.php?mode=metadataOptional filter
measurement=raspistatuscurl
curl "https://allskykamera.space/api/v1/weather.php?mode=metadata" \
  -H "X-API-Key: DEIN_GEHEIMER_KAMERA_KEY"

curl "https://allskykamera.space/api/v1/weather.php?mode=metadata&measurement=raspistatus" \
  -H "X-API-Key: DEIN_GEHEIMER_KAMERA_KEY"
Example response
{
  "status": "ok",
  "mode": "metadata",
  "kamera": "ASK001",
  "range": "-30d",
  "measurements": [
    {
      "name": "raspistatus",
      "fields": ["raspiDiskFree", "raspiTemp"],
      "last_seen": "2026-05-20T12:34:00Z"
    },
    {
      "name": "ext_sensors",
      "fields": ["temp_c", "hum_pct", "pressure_hpa"],
      "ext_sensors": ["bme280_aussen", "tsl2591"],
      "last_seen": "2026-05-20T12:40:00Z"
    }
  ]
}
Invalid measurement filters return HTTP 400 with {"status":"error","error":"invalid_measurement"}. The metadata range is currently the last 30 days.
Measurements and fields
The current endpoint does not enforce a fixed measurement list for GET. These names are visible in the code or existing examples and are examples, not a complete catalog.
| Measurement | Typical fields | Note |
|---|---|---|
ext_sensors | temp_c, hum_pct, pressure_hpa, sky_brightness | Measurement used by POST uploads. |
SQM | sqm, sky_brightness | Plausible/read example; exact field names depend on stored data. |
raspistatus | raspiDiskFree | Used in existing GET examples. |
Response formats
POST
HTTP/1.1 200 OK
Content-Type: application/json

{
  "status": "ok"
}
GET
GET returns a JSON array. It may be empty if no matching values exist.
Error codes
| HTTP | Meaning | Typical reason | Example response |
|---|---|---|---|
400 | Invalid request | Invalid JSON, missing timestamp/fields, invalid timestamp, or no numeric field values. | {"error":"Invalid JSON"} |
401 | Missing or invalid API key | X-API-Key header missing or key not found in the key list. | {"error":"Missing API key"} |
405 | Wrong HTTP method | Any method except GET and POST. | {"error":"Method not allowed"} |
429 | Too Many Requests | Minimum interval, daily limit or monthly limit exceeded. | {"error":"Rate limit (interval) exceeded","retry_after_seconds":42} |
500 | Internal server error | Key list cannot be loaded or Influx write/query failed. | {"error":"Failed to query Influx"} |
Limits
The limits are enforced per camera and tracked separately for writes and reads.
POST / data upload limits
- Minimum interval: 59 seconds between writes.
- Daily limit: 5,000 POST requests.
- Monthly limit: 130,000 POST requests.
GET / data retrieval limits
- Minimum interval: 119 seconds between reads.
- Daily limit: 600 GET requests.
- Monthly limit: 6,000 GET requests.
Please coordinate permanently higher frequencies with the administration before using them.
Examples
curl POST
curl -X POST "https://allskykamera.space/api/v1/weather.php" \
  -H "Content-Type: application/json" \
  -H "X-API-Key: DEIN_GEHEIMER_KAMERA_KEY" \
  -d '{"timestamp":"2026-05-20T21:15:00Z","ext_sensor":"Dachstation","fields":{"temp_c":22.9,"hum_pct":48.5,"pressure_hpa":1002.8}}'
curl GET
curl "https://allskykamera.space/api/v1/weather.php?measurement=ext_sensors&fields=temp_c,hum_pct&start=-6h&aggregate=mean&every=5m&pivot=1&limit=100" \
  -H "X-API-Key: DEIN_GEHEIMER_KAMERA_KEY"
Python POST
#!/usr/bin/env python3
import requests
from datetime import datetime, timezone

API_URL = "https://allskykamera.space/api/v1/weather.php"
API_KEY = "DEIN_GEHEIMER_KAMERA_KEY"
payload = {"timestamp": datetime.now(timezone.utc).strftime("%Y-%m-%dT%H:%M:%SZ"), "ext_sensor": "Dachstation", "fields": {"temp_c": 22.9, "hum_pct": 48.5, "pressure_hpa": 1002.8}}
response = requests.post(API_URL, headers={"X-API-Key": API_KEY, "Content-Type": "application/json"}, json=payload, timeout=10)
print(response.status_code, response.text)
Python GET
import requests

API_URL = "https://allskykamera.space/api/v1/weather.php"
API_KEY = "DEIN_GEHEIMER_KAMERA_KEY"
params = {"measurement": "ext_sensors", "fields": "temp_c,hum_pct", "start": "-6h", "aggregate": "mean", "every": "5m", "pivot": 1, "limit": 100}
response = requests.get(API_URL, params=params, headers={"X-API-Key": API_KEY}, timeout=10)
print(response.status_code)
print(response.json()[:3])
ESP32 / Arduino POST
#include <WiFi.h>
#include <HTTPClient.h>

const char* ssid = "DEIN_WLAN";
const char* password = "DEIN_PASSWORT";
const char* apiUrl = "https://allskykamera.space/api/v1/weather.php";
const char* apiKey = "DEIN_GEHEIMER_KAMERA_KEY";

void setup() {
  Serial.begin(115200);
  WiFi.begin(ssid, password);
  while (WiFi.status() != WL_CONNECTED) delay(500);
}

void loop() {
  if (WiFi.status() == WL_CONNECTED) {
    HTTPClient http;
    http.begin(apiUrl);
    http.addHeader("Content-Type", "application/json");
    http.addHeader("X-API-Key", apiKey);
    String payload = R"({"timestamp":"2026-05-20T21:15:00Z","ext_sensor":"ESP32_Weather","fields":{"temp_c":23.4,"hum_pct":51.2}})";
    int httpCode = http.POST(payload);
    Serial.printf("HTTP: %d\n", httpCode);
    Serial.println(http.getString());
    http.end();
  }
  delay(60000);
}
Raspberry Pi minimal example
from datetime import datetime, timezone
import requests

requests.post("https://allskykamera.space/api/v1/weather.php", headers={"X-API-Key": "DEIN_GEHEIMER_KAMERA_KEY"}, json={"timestamp": datetime.now(timezone.utc).isoformat().replace("+00:00", "Z"), "ext_sensor": "RaspberryPi", "fields": {"cpu_temp_c": 48.2}}, timeout=10)
Security and privacy
- Keep the API key secret and use it only in trusted server-side or device-side code.
- Do not send personal data in ext_sensor or field names.
- Do not send location data unless you intentionally want it to be stored and potentially shown.
- Measurements are assigned to the camera in the network through the API key.
Display on the camera page
Values are stored first. In the user area you can name fields, group them, assign units and decide whether they are visible. Only activated sensors appear on the public camera page.
1. External sensors in the user area

In your user profile you can open the configuration for external sensors.
2. Sensor configuration
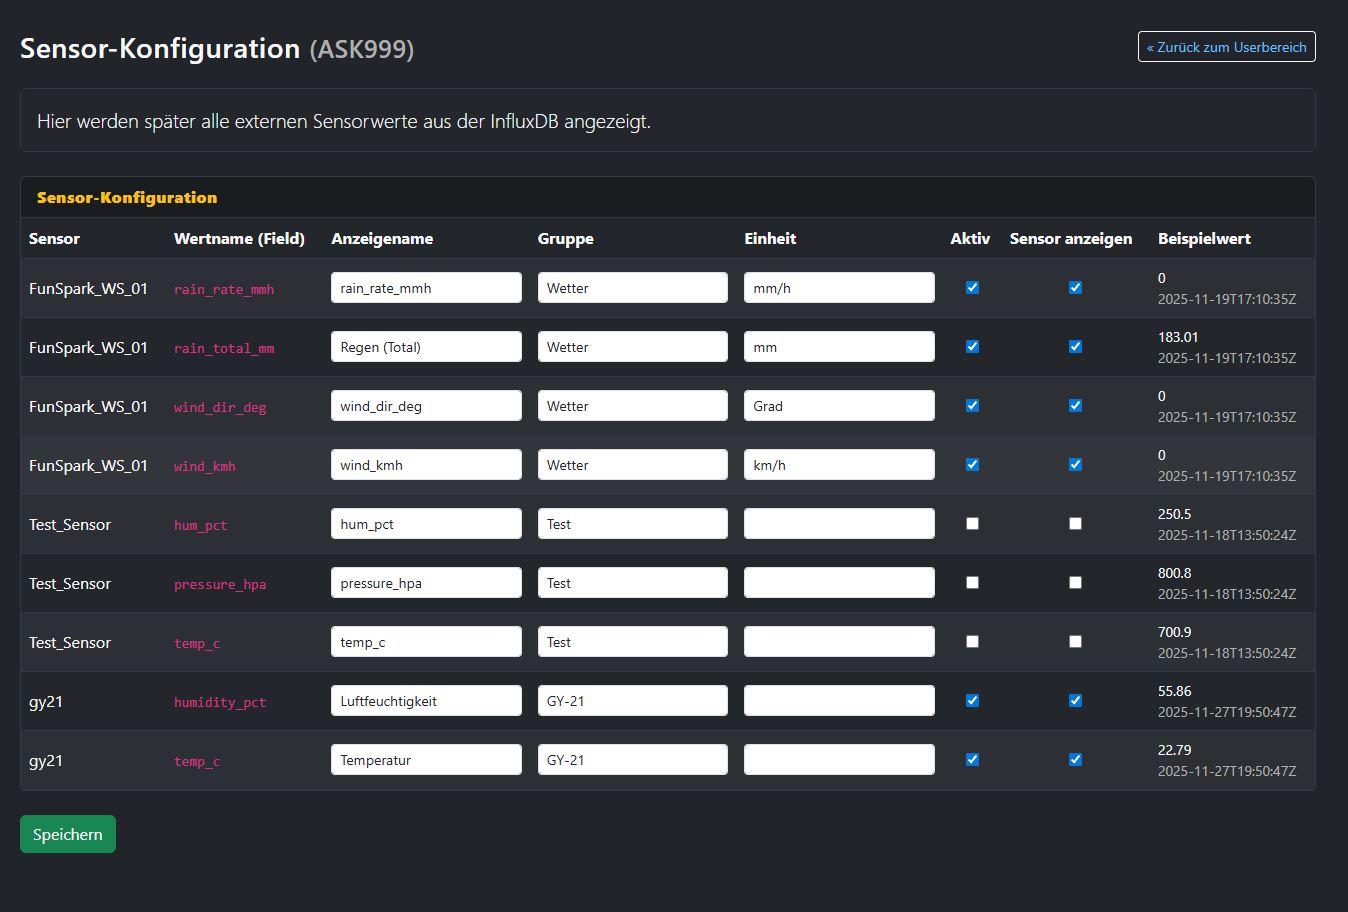
In the sensor configuration you define display names, groups, units and visibility.
3. Display on the camera page
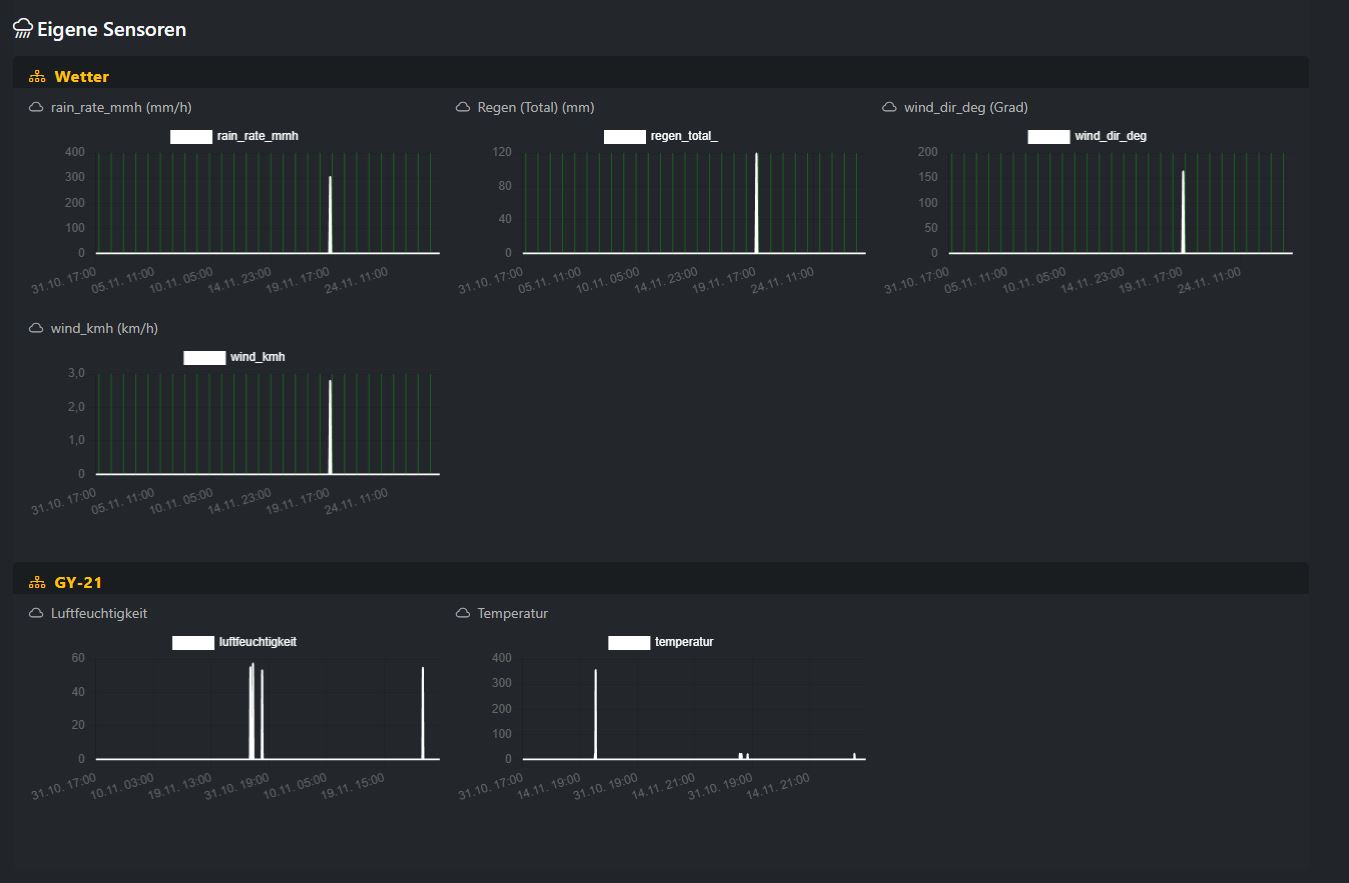
On the camera page the selected sensors are shown as grouped charts.