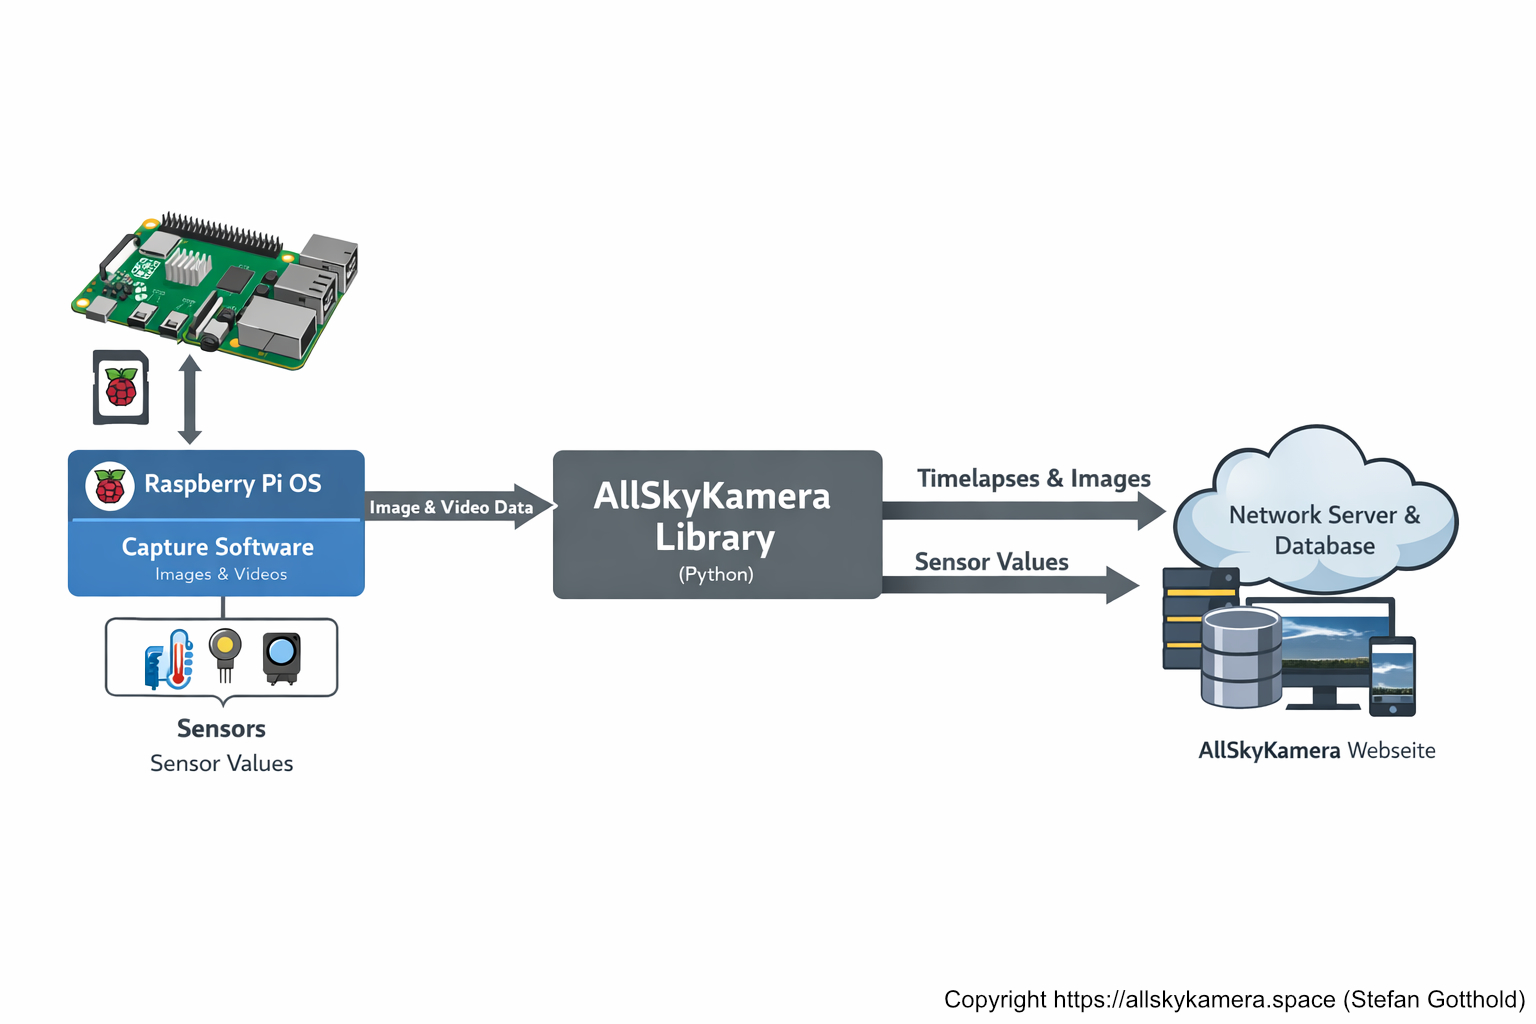
💾 Installation

Installation in three steps: set up the operating system, install an all-sky interface, and then install the AllSkyKamera library.

This page is intentionally compact — we’ll expand it step by step.
Quick overview
  • OS: Raspberry Pi OS (Bookworm/Trixie)
  • Interface: INDI-AllSky or TJ-Allsky
  • Next: Install AllSkyKamera library

🧭 How it all fits together

First you set up the operating system and the capture interface. Then the AllSkyKamera library collects the generated images/videos as well as sensor data and uploads everything to the network server for the website.
Overview
Diagram: Raspberry Pi OS + interface -> AllSkyKamera library -> network server
Open image in full size
In short
  • Raspberry Pi OS is the foundation.
  • The interface creates images & videos.
  • The library uploads media + sensor values to the server.
Once you understand the concept, the rest is mainly a clean installation and wiring.
1) ⚙️ Install OS
Jump

Base system on SD card, first updates, basic setup.

2) 🖥️ All-sky interface
Jump

Choose between INDI-AllSky and TJ-Allsky.

3) 🚀 AllSkyKamera library
Jump

Uploads, sensors, cronjobs and your network setup.

⚙️ 1) Install Raspberry Pi OS

Install a lightweight Raspberry Pi OS (Bookworm or Trixie). Then we update the system and enable the required interfaces.
Base

💾 Image & first boot

Write Raspberry Pi OS to the SD card and enable SSH right away. Then boot the Pi and verify the basics.

  • Open Raspberry Pi Imager
  • Select Raspberry Pi OS (Bookworm or Trixie)
  • Select SD card & write (enable SSH in the settings)
🔄 Updates

First: update the system.

sudo apt update && sudo apt upgrade -y
🔌 Enable interfaces (required)

Several interfaces must be enabled on the Raspberry Pi in order to use sensors and extensions.

Option 1: Enable via raspi-config (recommended)
sudo raspi-config
  • Interface Options → SSH → Enable
  • Interface Options → I2C → Enable
  • Interface Options → 1-Wire → Enable
Option 2: Enable via command line
sudo raspi-config nonint do_i2c 0
  sudo raspi-config nonint do_onewire 0
  sudo systemctl enable ssh
  sudo systemctl start ssh
sudo reboot
Tip: After rebooting, use “i2cdetect -y 1” to verify that I²C devices are detected correctly.

🖥️ 2) Installation of an Allsky interface

The interface controls image capture, timelapses, keograms, and star trails. You can choose between TJ-Allsky and INDI-Allsky.
Choice

⭐ TJ-Allsky (AllskyTeam)
Recommended
Lightweight and simple – includes all essential AllSky features.
Widely used, well documented, and strongly supported by the community. Supports Raspberry Pi HQ and ZWO ASI cameras.
  
git clone https://github.com/AllskyTeam/allsky.git
cd allsky
./install.sh
🛰️ INDI-Allsky
Optional
A lot of settings – powerful, but can feel “over-engineered”.
Provides extra features and supports many camera types. Great if you are already using the INDI ecosystem.
Note: The INDI-AllSky path will be used later by the AllSkyKamera library installer logic.
Next
Once your interface is running, you can install the AllSkyKamera library and test first uploads/sensors.
🐍

3) AllSkyCamera Library (Python) – the core of the network

Central component

The AllSkyCamera library is the central component of the AllSkyCamera network. It connects camera, sensors, and server – and ensures that images, videos, and measurements reliably arrive in the network and are visible on the website.

What the library does
  • Sensor features & measurement logging (e.g., temperature, humidity, sky brightness)
  • Uploads files such as timelapse videos, star trails, and keograms to the network server
  • Sends sensor data to InfluxDB for analysis & visualization
Security, ASK ID & participation
  • Uploads work only with a secret key (issued by me)
  • Each camera gets a unique ASK ID (ASK = AllSkyCamera) to identify it in the network
  • Request your key via “Join / Mach mit” – then complete setup and assignment
The library runs automatically via cron jobs: it regularly transfers data to the server and to InfluxDB so your camera stays up to date on the website.
In the GitHub wiki you will find scripts, function documentation, and sensor guides. For some sensors, mathematical calculations (e.g., calibration, dew point) are explained openly and transparently.
🧪

Test installation & prototyping

For a test installation (prototype), the AllSkyCamera library can be installed locally. This allows you to test sensors and hardware without sending any data to the network server.

  • No secret key or test key required
  • Sensors can be tested individually in the “tests” subdirectory
  • Ideal for setup, wiring, and initial functionality checks
cd
git clone https://github.com/gottie29/AllSkyKamera.git
cd AllSkyKamera/tests
Once the hardware runs reliably and the sensors work correctly, you can request a secret key and officially connect the camera to the network.
← Overview Sensors →